How sowing seeds in Milk Jugs is a game changer

Sowing seeds in milk jugs is the most uninvolved way to start seeds. Once you get your jugs set up, there is virtually nothing else you need to do unless you need to do supplemental watering. If you like hands off seed starting, this post is for you!
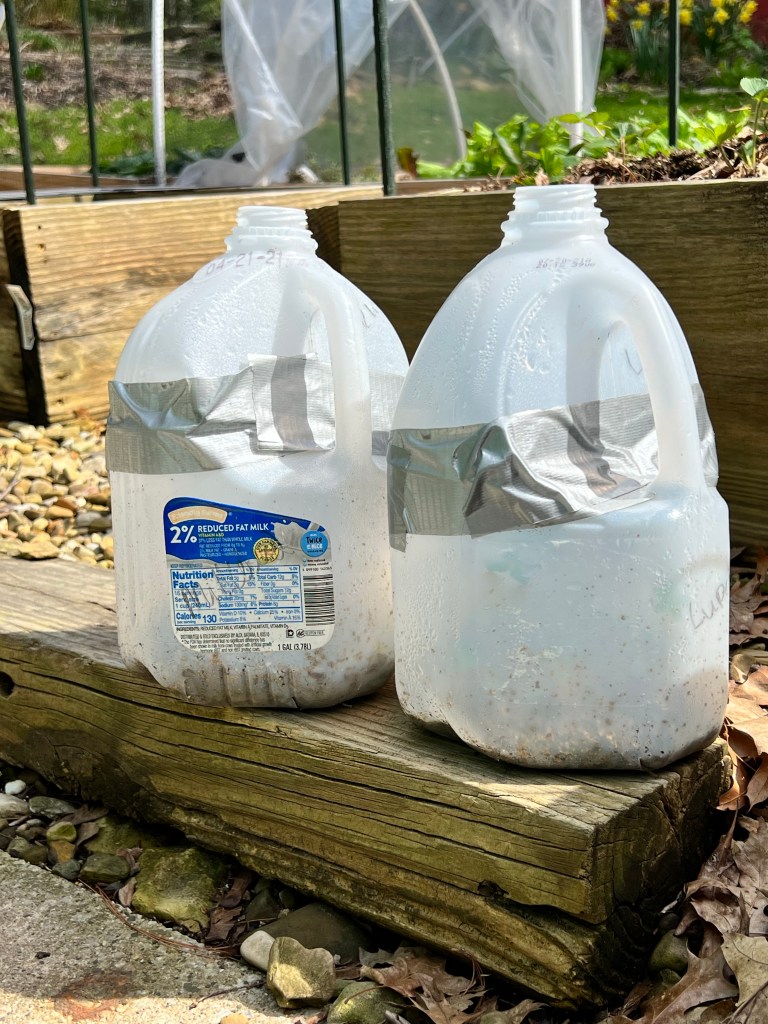
Sowing seeds in milk jugs is wonderful for several reasons. One, because this kind of seed starting requires less hands-on work. The jugs take care of everything by creating a micro greenhouse within and protecting the seeds from the elements. Two, you do not need to harden off seedlings sown in milk jugs. They are already acclimated to the climate by planting time, so no need to transition which can save you a week. You will also not need to cold stratify your seeds because they will go through a stratification process within the jug.
Gather up your milk jugs!
I start collecting empty gallon milk jugs as early as August the year before. As we empty them I wash them out and save them. How many you collect is up to you. I have 20 jugs right now, but will likely not use them all. You can use any type of jugs you want. I’ve used half gallons jugs, 2 liter pop bottles, and OJ cartons
Prepare your jugs
To prepare the jugs for sowing seeds using sharp scissors, I snip at least four small holes or slits in the bottom of the jugs for drainage. Once my drainage holes are cut I cut the jug in half leaving the handle uncut.
Soil
Now that you’ve got your jugs cut, it’s time to add soil. For my jugs, I used Vermiculite this year instead of a packaged seed starting mix. You can and should use a seed starting mix because it’s light and fluffy, which is perfect for sowing seeds in milk jugs. Make sure to pre moisten your soil to make life easier then add enough soil or Vermiculite to fill half the jug. That’s about 2ins.
Watering
If you experience regular rain, snow and cold winters, you should only need to water your jugs once when you pre moisten the soil. If your winters are mostly dry, you will need to water your jugs when they appear dry.
Sowing seed
Follow the seed packet instructions as to how to plant your seeds in the soil. Some seeds require surface sowing and others need to be buried in the soil. You will have to do the due diligence on this part and read the seed packet.
Close up the jugs
Once your jugs are seeded, you can now use duct tape and close up the jugs. I use duct tape all around, sealing up any holes. At this point you can discard the lid to the jugs as you do not need them. The opening at the top is how the jugs will get water throughout the winter.
When to open your jugs
So when should you open your jugs? I recommend opening your jugs once your temps are consistently 46 degrees or higher in spring. Your seedlings will be fully acclimated to the temperatures and the sun so there’s no need to harden them off.
When to plant your seedlings
Divide and plant your seedlings one week after opening your jugs if they have a set of “true” leaves. True leaves are the second set of leaves grown by the seedling. Be sure to use care when separating the seedlings and always hold the true leaves while using a fork or garden tool to lift the roots.
Tips for success:
Do not water your jugs unless you haven’t had snow or rain for at least one week. If that’s the case, give them a bit of water. They don’t need to be dripping wet.
If your area has been covered in snow for weeks don’t worry about watering. Snow will make its way inside the jugs and once melted will water your jugs.
Don’t worry if you see growth at any point during winter. The jugs act as a greenhouse and will protect your seedlings from the elements.
This method of sowing seeds may not be right for you but I suggest you try it once. It could be a game changer for the busy gardener.
Happy Gardening
Ciearra
