How to Start a No-Dig Flower Bed Without Removing Grass
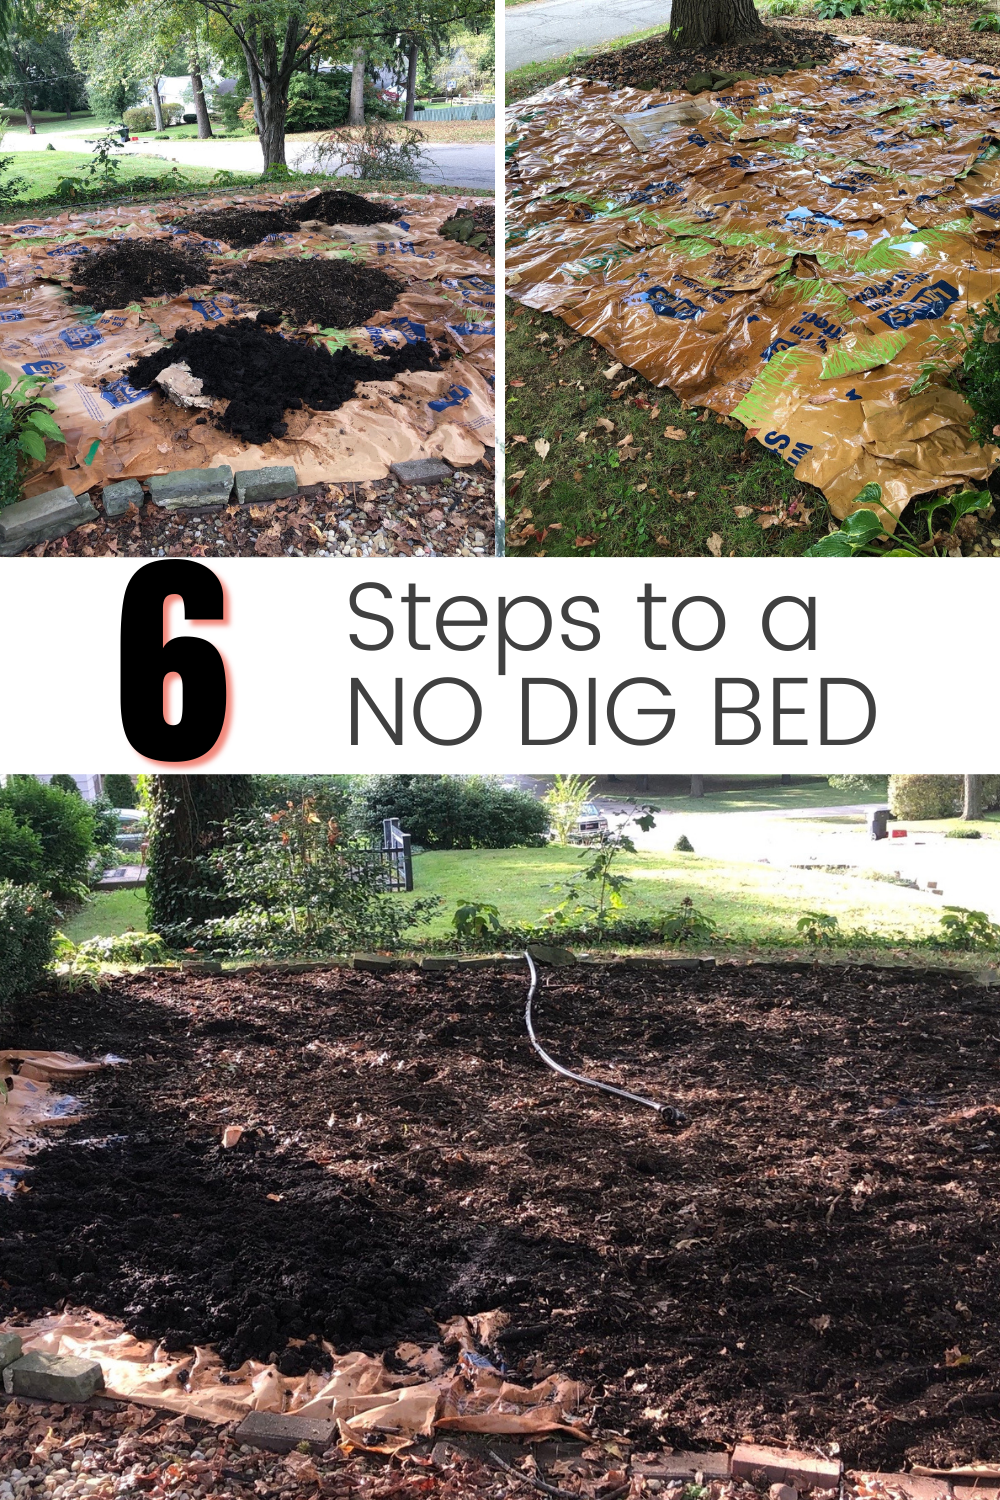
Creating a beautiful flower bed doesn’t have to mean hours of backbreaking work removing sod or digging up your yard. A no-dig flower bed is one of the easiest ways to transform a patch of grass into a thriving garden while improving your soil naturally over time.
Whether you’re starting a brand-new garden, expanding your landscape, or tackling a large planting area, the no-dig method saves time, reduces soil disturbance, and requires far less physical labor than traditional bed preparation. It may take a little patience as the layers break down, but the long-term results are well worth the wait.
In this guide, I’ll walk you through the simple step-by-step process I used to create my own no-dig flower bed, along with tips to help you avoid common mistakes and set your new garden up for success.
Quick Answer
A no-dig flower bed is created by layering cardboard, compost, and mulch directly over existing grass instead of digging it up. Over time, the grass decomposes underneath while worms and soil microbes improve the soil naturally. Most no-dig beds are ready to plant within a few months, depending on the materials used.


Why Choose No-Dig Gardening?
If you’ve ever looked at a patch of lawn and thought, “There’s no way I’m digging all of that up,” you’re not alone! That’s exactly why I love the no-dig gardening method. Instead of spending hours removing sod and turning over the soil, you let nature do most of the hard work for you.
A no-dig flower bed is created by layering materials like cardboard, compost, and mulch directly over existing grass. Over time, the grass and cardboard break down, enriching the soil below while earthworms and beneficial microorganisms improve its structure naturally.
Here are a few reasons why so many gardeners are making the switch to no-dig gardening:
It’s Much Easier on Your Body
Digging up grass is one of the most physically demanding gardening tasks. If you’re creating a large flower bed or simply want to save your back and knees, the no-dig method is a much more manageable option.
You Improve Your Soil Instead of Disturbing It
Healthy soil is full of earthworms, fungi, and beneficial microbes that work together to support healthy plants. Digging can disrupt these natural ecosystems, while a no-dig garden allows them to continue improving the soil as organic materials decompose.
Fewer Weeds to Deal With
The layer of cardboard blocks sunlight from reaching the grass and many existing weeds, helping to smother them before they become a problem. A thick layer of mulch also helps prevent new weed seeds from sprouting.
Better Moisture Retention
The layers of compost and mulch act like a blanket, helping the soil hold moisture longer. This can reduce how often you need to water, especially during the hot summer months.
Great for Large Garden Projects
Whether you’re creating a pollinator garden, planting a perennial border, or converting part of your lawn into a flower bed, no-dig gardening makes large landscaping projects much more achievable without renting equipment or spending days digging.
Healthier Soil Year After Year
One of the biggest advantages of no-dig gardening is that it keeps getting better with time. As the cardboard, compost, and mulch break down, they continue feeding the soil, improving drainage, and increasing organic matter. With a little maintenance each year, your flower bed will become healthier and more productive season after season.
While a no-dig flower bed isn’t an overnight solution, it’s one of the simplest and most sustainable ways to create a beautiful garden. With a little patience, you’ll end up with rich, healthy soil that’s ready to support flowers, shrubs, and even vegetables for years to come.
A nice transition into your first step would be something like: “Now that you know the benefits of no-dig gardening, let’s gather your supplies and get started building your new flower bed.”
Here’s a supply list that fits the style of your post. It’s easy to scan, SEO-friendly, and gives readers optional items depending on how they’re building their bed.
Supplies You’ll Need
Before you get started, gather your supplies so the project goes as smoothly as possible. The exact amount you’ll need will depend on the size of your new flower bed.
Essential Supplies
- Cardboard boxes (with all tape, labels, and staples removed) or paper lawn bags
- Compost or quality garden soil
- Mulch (shredded hardwood, pine bark, cedar, or wood chips)
- Garden hose with a spray nozzle
- Wheelbarrow or garden cart
- Garden rake
- Garden gloves
- Measuring tape
Optional Supplies
- Landscape marking paint, flour, or a garden hose to outline your flower bed
- Shovel (for moving compost or mulch)
- Garden edging (to create a clean border)
- Utility knife or box cutter (to cut cardboard to size)
- Compost fork or pitchfork (for spreading compost)
Best Materials to Use
Cardboard: Plain brown corrugated cardboard works best. Avoid glossy cardboard, wax-coated boxes, and anything with tape or plastic attached.
Compost: Homemade compost, bagged compost, mushroom compost, leaf compost, or well-aged manure are all excellent choices.
Mulch: Shredded hardwood mulch, pine bark mulch, cedar mulch, or natural wood chips all work well for finishing your no-dig flower bed.
Pro Tip: Start collecting cardboard a few weeks before your project. Appliance stores, furniture stores, grocery stores, and your own online deliveries are great places to find clean cardboard for free.
How to create a No Dig Flower Bed
Step 1: Outline Your Flower Bed
The first step in creating a no-dig flower bed is deciding exactly where you want it to go. Take your time with this step because the shape and location of your flower bed will determine how well your plants grow and how the finished garden looks.
Start by choosing an area that receives the amount of sunlight your future plants will need. If you’re planning to grow sun-loving flowers like coneflowers, zinnias, or black-eyed Susans, look for a spot that gets at least six hours of direct sunlight each day. For shade-loving plants like hostas, ferns, or astilbe, choose an area that’s protected from the afternoon sun.
Once you’ve picked the perfect location, outline the shape of your new flower bed. You can use a garden hose, rope, landscape marking paint, or even flour to create a temporary border. This makes it easy to step back, view the design from different angles, and make adjustments before you begin layering your materials.
Don’t be afraid to think beyond a simple rectangle. Curved beds often look more natural and can soften the landscape, while straight edges create a clean, formal appearance. Consider how you’ll mow around the bed, where walkways will go, and how large your plants will become as they mature. Giving plants enough room to grow now will save you from overcrowding later.
Before moving on to the next step, measure the length and width of your flower bed. Knowing the square footage will help you estimate how much cardboard, compost, and mulch you’ll need, making your trip to the garden center much easier.
Pro Tip
Stand inside your house and look out the windows toward your new flower bed. This is the view you’ll enjoy every day, so make sure you’re happy with the size, shape, and placement before you start building.

Step 2: Gather Cardboard or Paper Lawn Bags
Now it’s time to gather the materials that will form the foundation of your no-dig flower bed. Cardboard is one of the best materials for smothering grass because it blocks sunlight while still allowing water and beneficial organisms to move through to the soil below.
Large cardboard boxes work well, but make sure to remove any packing tape, labels, staples, or plastic before using them in your garden. Plain, brown corrugated cardboard breaks down naturally and is the best choice. Avoid glossy or heavily printed cardboard, as it may contain coatings that aren’t ideal for your garden.
If you don’t have enough cardboard, paper lawn bags are another great option. They decompose quickly and work just as well for covering grass and suppressing weeds. You can even use a combination of cardboard and paper lawn bags if you’re creating a larger flower bed.
Gather enough material to cover your entire planting area, allowing each piece to overlap the next by about 6 inches. Overlapping the edges is important because it prevents grass and weeds from finding gaps where they can grow through.
Pro Tip
Start collecting cardboard several weeks before you build your flower bed. Appliance boxes, moving boxes, and deliveries are excellent sources, and many local stores are happy to give away clean cardboard they would otherwise recycle.

Step 3: Lay the Cardboard Within Your Flower Bed Outline
Now that you have your cardboard collected, it’s time to create the first layer of your no-dig flower bed. Place the cardboard directly on top of the grass, staying within the outline you created in the first step.
Before laying it down, make sure you remove all tape, labels, staples, and plastic packaging materials from the cardboard. While cardboard itself will break down and become part of your soil, these materials will not compost and can leave you with a frustrating cleanup job later. The last thing you want is to be digging through your beautiful new flower bed next year trying to remove pieces of tape that were buried underneath your plants.
As you lay out the cardboard, overlap each piece by at least 6 inches to prevent grass and weeds from finding their way through the gaps. Think of this layer as a barrier that blocks sunlight and smothers the vegetation underneath, so covering every inch of the ground is important.
Once your cardboard is in place, give it a thorough watering. Wet cardboard becomes softer, allowing it to mold to the shape of the ground while helping speed up the decomposition process. Moistening this layer also encourages earthworms and soil organisms to begin breaking it down and incorporating it into the soil below.
Don’t worry if the cardboard layer looks messy at first. This is just the foundation of your new garden bed, and it will soon be covered with compost and mulch. The goal isn’t perfection it’s creating a thick, effective barrier that gives your future plants the healthy growing environment they need.
Pro Tip
If you’re working on a large flower bed, have someone help you lay out the cardboard. It can be much easier to arrange large pieces together rather than trying to manage a stack of boxes by yourself.
For more ways to save money while gardening read this post packed full of tips!

Step 4: Water Down the Cardboard Layer
As you lay out your cardboard or paper lawn bags, take the time to thoroughly soak each section with a garden hose. This simple step helps start the decomposition process by softening the cardboard and allowing it to begin breaking down into the soil beneath.
Wetting the cardboard also helps keep everything in place while you’re working. Dry cardboard can act like a sail on a windy day, and trust me, I learned this the hard way! A quick spray of water will keep your cardboard from shifting, curling up, or blowing away before you have a chance to cover it with compost and mulch.
Make sure the cardboard is completely saturated, especially around the edges and seams where pieces overlap. This will help the layers stay connected and create a better barrier against grass and weeds trying to grow through.
Pro Tip
If you’re creating a large no-dig flower bed, work in smaller sections. Lay down a few pieces of cardboard, wet them thoroughly, and then cover them with your next layer before moving on. This keeps the process much more manageable and prevents your cardboard from turning into a backyard kite!

Step 5: Add a Layer of Compost or Soil
Once your cardboard or paper lawn bags are laid out and thoroughly soaked, it’s time to add the next layer of your no-dig flower bed. This layer is where you begin building the rich, healthy growing environment your plants will love.
Spread a layer of compost, garden soil, or a quality planting mix directly over the cardboard. This added layer provides nutrients for your future plants while also helping weigh down the cardboard so it stays in place as it continues to break down.
For the best results, aim for a layer that is about 2–4 inches thick. If you’re creating a large flower bed, you may need several wheelbarrow loads of compost, so planning ahead can save you time and effort.
Compost is my preferred choice because it adds organic matter, improves soil structure, and feeds the beneficial organisms living in your garden. You can use homemade compost, bagged compost, mushroom compost, leaf compost, or well-aged manure. If compost isn’t available, a quality garden soil or planting mix can also work.
As you spread your compost, make sure you cover the entire cardboard layer, including the edges and corners. Leaving exposed cardboard can allow it to dry out, making it slower to break down and more likely to shift in the wind.
At this point, your no-dig flower bed is already starting to transform. The grass underneath is being smothered, the cardboard is beginning to break down, and the compost is creating the perfect environment for your future flowers.
Pro Tip
Don’t worry if the soil layer looks too high at first. Organic materials will settle as they decompose. Starting with a generous layer gives your plants a better foundation and helps your new flower bed establish faster.

Step 6: Finish with a Layer of Mulch
The final step is to spread a generous layer of mulch over the compost or soil. Mulch not only gives your new flower bed a finished, polished look, but it also helps lock in moisture, regulate soil temperature, and reduce weed growth while your new garden becomes established.
There are many types of mulch to choose from, including shredded hardwood, pine bark, wood chips, or natural cedar mulch. Pick the one that best matches your landscape and your budget. I like using a natural hardwood mulch because it looks great and slowly breaks down over time, adding even more organic matter to the soil.
Aim for a mulch layer that is about 2–3 inches deep, making sure to cover the compost evenly without piling it up against the stems of any plants you may be adding.
Once the mulch is in place, give your entire flower bed a thorough watering. This helps settle the compost and mulch, adds moisture to the cardboard underneath, and encourages the decomposition process to continue.
That’s it you’ve officially created a no-dig flower bed! Now all that’s left to do is let nature work its magic. As the cardboard and organic materials break down, they’ll create rich, healthy soil that’s perfect for growing flowers, shrubs, or even vegetables. With just a little patience, you’ll have a beautiful garden bed that will continue to improve year after year.
Pro Tip
Refresh your mulch each spring with a thin new layer to help suppress weeds, retain moisture, and keep your flower bed looking neat throughout the growing season.

My Final Thoughts
Congratulations! If you’ve followed each step, you’ve successfully created your very own no-dig flower bed using the lasagna gardening method. By layering cardboard, compost, and mulch, you’ve built the perfect foundation for healthy, nutrient-rich soil all without the backbreaking work of digging up your lawn.
Now comes the hardest part: waiting! Allow your new garden bed to decompose for 3–6 months before planting. During this time, the cardboard will begin breaking down, the grass underneath will die off, and earthworms and beneficial soil microbes will transform the layers into rich, fertile soil.
The patience will be worth it. When your bed is ready, you’ll have a beautiful planting space that’s full of organic matter and ready to support flowers, shrubs, or even vegetables for years to come.
No-dig gardening has become one of my favorite ways to create new garden beds because it’s simple, budget-friendly, and lets nature do most of the work. Whether you’re building a small flower border or transforming a large section of your yard, this method is an easy way to create a thriving garden without hours of digging.
I hope this guide gives you the confidence to start your own no-dig flower bed. If you decide to give it a try, I’d love to hear about your experience! Leave a comment below and let me know what you’re planning to grow in your new garden.
Happy Gardening! 🌿
Want More?
Houseplants are gorgeous living home decor. It is worthwhile learning how to properly care for them.
IF YOU LIKE THIS POST
You might also like these:
- How to properly water your houseplants
- Best soil to tropical houseplants
- Best Indoor Trailing Houseplants
We’d love to hang out with you on our social channels. You can subscribe to our blog and find us on Facebook, Youtube, Instagram and Pinterest! Feel free to reach out if you have any plant questions!
DISCLOSURE
This blog post may contain affiliate links. Which means if you click on a link and go on to buy the product I recommend, I may get a small commission at no extra cost to you.
Thank you for your support. It means the world to us!

The Thrifted Planter
Ciearra is a gardener and houseplant enthusiast of over 10 years! She has been growing indoors and outdoors. Supplying food for her family and beautifying her home with annuals, perennials and houseplants! Ciearra is passionate about sharing her knowledge of plant care with anyone who needs help or a quick plant growth tip! When she’s not blogging you can find her tending to her chickens, dogs and hanging out with her family
Nestera Chicken Coop

Botanical Interest
Garden Tower Project
Vego Gardens

Botanical Interests
Amazon Favorites!

Hoselink
Web Stories


